用自己的案例做tf_serving部署
tf_serving 部署
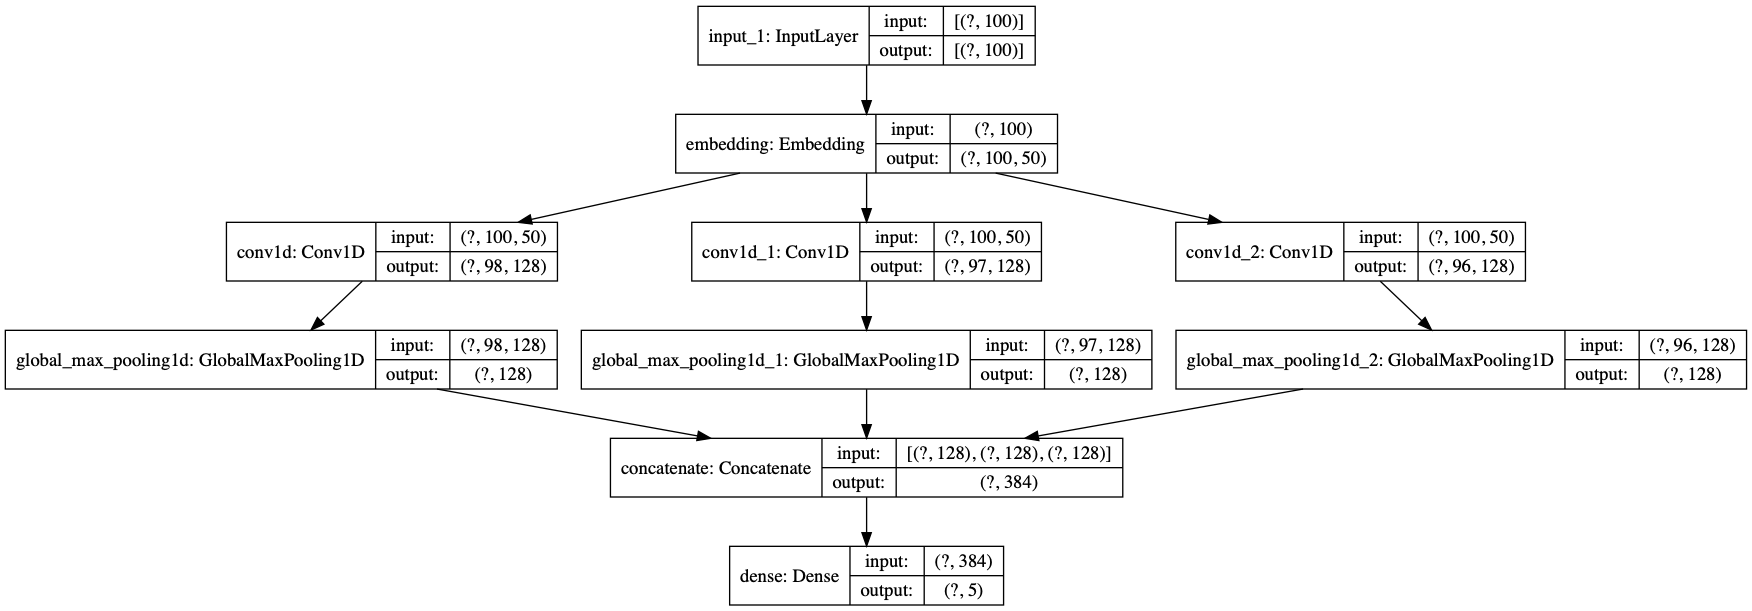
Step1: 模型构建与训练
我们通过模型构建与训练后,我们可以得到模型(cnn_model.h5)
模型结构打印
from tensorflow.keras.utils import plot_model
plot_model(model, show_shapes=True, show_layer_names=True)
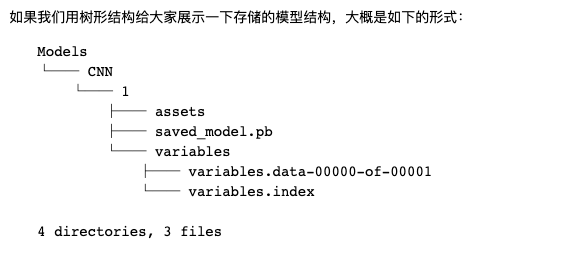
Step2: 模型的导出与检查
模型导出
import tensorflow as tf
import shutil

model = tf.keras.models.load_model('./cnn_model.h5')

#  指定路径
if os.path.exists('./Models/CNN/1'):
     shutil.rmtree('./Models/CNN/1')
export_path = './Models/CNN/1'

# 导出tensorflow模型以便部署
tf.saved_model.save(model,export_path)
模型的部署前检查与测试
tensorflow官方提供了非常好的一些工具给大家,比如在实际部署服务之前,我想强调一下TensorFlow的SavedModel命令行工具,这对于快速检查我们模型的输入和输出规范很有用,我们用下面的命令检查一下我们的CNN模型:
$ saved_model_cli show --dir ./Models/CNN/1 --all
我们会看到以下输出信息:
MetaGraphDef with tag-set: 'serve' contains the following SignatureDefs:

signature_def['__saved_model_init_op']:
  The given SavedModel SignatureDef contains the following input(s):
  The given SavedModel SignatureDef contains the following output(s):
    outputs['__saved_model_init_op'] tensor_info:
        dtype: DT_INVALID
        shape: unknown_rank
        name: NoOp
  Method name is:

signature_def['serving_default']:
  The given SavedModel SignatureDef contains the following input(s):
    inputs['input_1'] tensor_info:
        dtype: DT_FLOAT
        shape: (-1, 100)
        name: serving_default_input_1:0
  The given SavedModel SignatureDef contains the following output(s):
    outputs['dense'] tensor_info:
        dtype: DT_FLOAT
        shape: (-1, 5)
        name: StatefulPartitionedCall:0
  Method name is: tensorflow/serving/predict
我们还可以随机送一些符合输入维度要求的数据给模型,看看输出结果的形态。
$ saved_model_cli run --dir ./Models/CNN/1 --tag_set serve --signature_def serving_default --input_exp 'input_1=np.random.rand(1,100)'
大家将看到以下输出:
serve --signature_def serving_default --input_exp 'input_1=np.random.rand(1,100)'
2019-06-13 16:33:46.095550: I tensorflow/core/platform/cpu_feature_guard.cc:142] Your CPU supports instructions that this TensorFlow binary was not compiled to use: AVX2 FMA
WARNING: Logging before flag parsing goes to stderr.
W0613 16:33:46.095993 140736529130432 deprecation.py:323] From /usr/local/lib/python3.6/site-packages/tensorflow/python/tools/saved_model_cli.py:339: load (from tensorflow.python.saved_model.loader_impl) is deprecated and will be removed in a future version.
Instructions for updating:
This function will only be available through the v1 compatibility library as tf.compat.v1.saved_model.loader.load or tf.compat.v1.saved_model.load. There will be a new function for importing SavedModels in Tensorflow 2.0.
W0613 16:33:46.141968 140736529130432 deprecation.py:323] From /usr/local/lib/python3.6/site-packages/tensorflow/python/training/saver.py:1276: checkpoint_exists (from tensorflow.python.training.checkpoint_management) is deprecated and will be removed in a future version.
Instructions for updating:
Use standard file APIs to check for files with this prefix.
Result for output key dense:
[[0.14112209 0.22561029 0.2605021  0.22022876 0.15253687]]
这表明我们随机输入长度为100的文本序列(词id)给模型,得到了长度为5的概率向量,分别表示5个类别的概率。到此为止,我们的模型一切正常。
模型部署与服务构建介绍
模型部署部分,强大的google生态下,已经有完整的部署方案,部署工具可以直接使用google的tensorflow-model-server。
tensorflow-model-server安装(最简单就是用docker来用tf serving)
我是使用docker来安装,方便简单,
如果是Ubuntu环境可以使用apt-get install安装,其他环境可以从源码编译,具体的内容大家可以参考:
关于tensorflow serving介绍
大家习惯使用TensorFlow进行模型的训练、验证和预测,但模型完善之后的生产上线流程,就变得五花八门了。针对这种情况Google提供了TensorFlow Servering,可以将训练好的模型直接上线并提供服务。早在2017年的TensorFlow开发者Summit上就提出了TensorFlow Serving。 但那时候客户端和服务端的通信只支持gRPC。在实际的生产环境中比较广泛使用的C/S通信手段是基于RESTfull API的,幸运的是从TF1.8以后,TF Serving也正式支持RESTfull API通信方式了。
服务框架
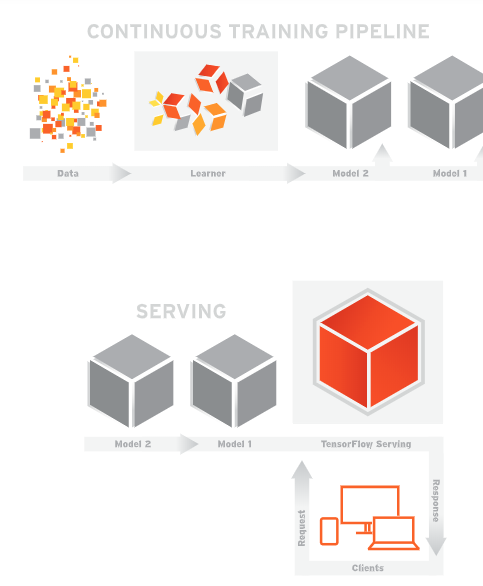
TF Serving服务框架
基于TF Serving的持续集成框架还是挺简明的,基本分三个步骤:
- 模型训练 这是大家最熟悉的部分,主要包括数据的收集和清洗、模型的训练、评测和优化;
- 模型上线 前一个步骤训练好的模型在TF Server中上线;
- 服务使用 客户端通过gRPC和RESTfull API两种方式同TF Servering端进行通信,并获取服务;
TF Serving工作流程
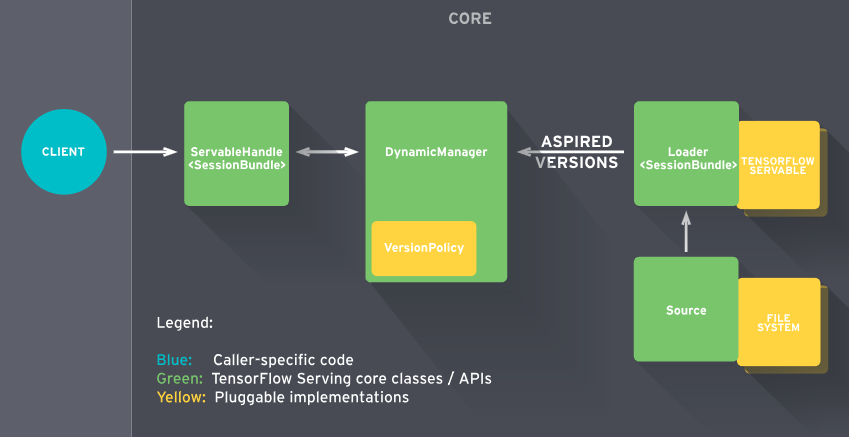
TF Serving工作流程
TF Serving的工作流程主要分为以下几个步骤:
- Source会针对需要进行加载的模型创建一个Loader,Loader中会包含要加载模型的全部信息;
- Source通知Manager有新的模型需要进行加载;
- Manager通过版本管理策略(Version Policy)来确定哪些模型需要被下架,哪些模型需要被加载;
- Manger在确认需要加载的模型符合加载策略,便通知Loader来加载最新的模型;
- 客户端像服务端请求模型结果时,可以指定模型的版本,也可以使用最新模型的结果;
简单示例
TF Serving客户端和服务端的通信方式有两种(gRPC和RESTfull API)
示例(一):RESTfull API形式
- 1. 准备TF Serving的Docker环境
目前TF Serving有Docker、APT(二级制安装)和源码编译三种方式,但考虑实际的生产环境项目部署和简单性,推荐使用Docker方式。
docker pull tensorflow/serving
- 2. 下载官方示例代码
示例代码中包含已训练好的模型和与服务端进行通信的客户端(RESTfull API形式不需要专门的客户端)
mkdir -p /tmp/tfserving
cd /tmp/tfserving
git clone https://github.com/tensorflow/serving
- 3. 运行TF Serving
docker run -p 8501:8501 \
  --mount type=bind,\
   source=/tmp/tfserving/serving/tensorflow_serving/servables/tensorflow/testdata/saved_model_half_plus_two_cpu,\
target=/models/half_plus_two \
-e MODEL_NAME=half_plus_two -t tensorflow/serving &
这里需要注意的是,较早的docker版本没有“--mount”选项,比如Ubuntu16.04默认安装的docker就没有(我的环境是Ubuntu 18.04)。
- 4.客户端验证
curl -d '{"instances": [1.0, 2.0, 5.0]}' \
  -X POST http://localhost:8501/v1/models/half_plus_two:predict
返回结果,
{ "predictions": [2.5, 3.0, 4.5] }
示例(二):gRPC形式
- 1. 准备TF Serving的Docker环境
目前TF Serving有Docker、APT(二级制安装)和源码编译三种方式,但考虑实际的生产环境项目部署和简单性,推荐使用Docker方式。
docker pull tensorflow/serving
- 2. 下载官方示例代码
mkdir -p /tmp/tfserving
cd /tmp/tfserving
git clone https://github.com/tensorflow/serving
- 3. 模型编译
python tensorflow_serving/example/mnist_saved_model.py models/mnist
- 4. 运行TF Serving
docker run -p 8500:8500 \
--mount type=bind,source=$(pwd)/models/mnist,target=/models/mnist \
-e MODEL_NAME=mnist -t tensorflow/serving
这里需要注意的是,较早的docker版本没有“--mount”选项,比如Ubuntu16.04默认安装的docker就没有(这里的环境是Ubuntu 18.04)。
- 5.客户端验证
python tensorflow_serving/example/mnist_client.py --num_tests=1000 --server=127.0.0.1:8500
返回结果,
Inference error rate: 11.13%
这里需要注意的是,直接运行mnist_client.py会出现找不到“tensorflow_serving”的问题,需要手动安装,
pip install tensorflow-serving-api
资料参考
TF Serving官方文档:https://www.tensorflow.org/tfx/guide/serving 个人的项目是使用RESTfull API形式,感觉简单很多,不需要gRpc形式那样创建客户端和模型编译
Step3: 具体实操, 安装Docker版的tensorflow/serving
目前TF Serving有Docker、APT(二级制安装)和源码编译三种方式,我使用Docker方式。
docker pull tensorflow/serving
Step4:模型部署
获取当前绝对路径
import os
# 获取当前绝对路径
MODEL_DIR = os.getcwd()+"/Models/RNN" #指定绝对路径
os.environ["MODEL_DIR"] = MODEL_DIR #设置全局变量
print(MODEL_DIR)  打印绝对路径
/Volumes/Untitled/NLP项目/docker部署/flask_news_classifier/Models/RNN
Step5: 用Docker启动tf serving
source这里一定要写绝对路径
target这里要写/models/自定义名字(比如rnn_serving)
MODEL_NAME 和target的自定义名字一样
%%bash --bg ##后台终端运行
docker run -p 8501:8501 --mount type=bind,source="${MODEL_DIR}",target=/models/rnn_serving -e MODEL_NAME=rnn_serving -t tensorflow/serving & >server.log 2>&1

# 写日记
! tail server.log

# 安装 requests包,用来接收请求

! pip install -q requests
Step6: 检测模型是否部署到docker上,进入终端
首先输入一下命令,查看运行的容器名字或者id
docker ps
![]()
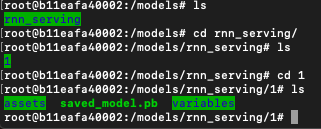
然后进入运行的容器,查看容器的models
docker exec -it 容器名字或者容器id /bin/bash
docker exec -it wonderful_meitner /bin/bash
cd models
ls

我们看到我们里面有文件夹rnn_serving,这就是我们之前step2tensorflow模型导出的文件
测试数据预处理
from tensorflow.keras.preprocessing import sequence
import random
from sklearn.model_selection import train_test_split
from tensorflow.keras.callbacks import EarlyStopping, ModelCheckpoint
from tensorflow.keras.utils import to_categorical
from utils import *
import json
import numpy
import requests
import jieba

# 路径等配置
data_dir = "./processed_data"
vocab_file = "./vocab/vocab.txt"
vocab_size = 40000

# 神经网络配置
max_features = 40001
maxlen = 100
batch_size = 256
embedding_dims = 50
epochs = 8

print('数据预处理与加载数据...')
# 如果不存在词汇表,重建
if not os.path.exists(vocab_file):
    build_vocab(data_dir, vocab_file, vocab_size)
# 获得 词汇/类别 与id映射字典
categories, cat_to_id = read_category()
words, word_to_id = read_vocab(vocab_file)
数据预处理与加载数据...
字典数据转换成json格式,使用request请求
text = "杨幂好漂亮,发生原子弹"
print(jieba.lcut(text))
text_seg = encode_sentences([jieba.lcut(text)], word_to_id)
text_input = sequence.pad_sequences(text_seg, maxlen=maxlen)

data = json.dumps({"signature_name": "serving_default",
                   "instances": text_input.reshape(1,100).tolist()})
headers = {"content-type": "application/json"}
json_response = requests.post('http://localhost:8501/v1/models/rnn_serving:predict',
                              data=data, headers=headers)
['杨幂', '好', '漂亮', ',', '发生', '原子弹']
呈现出测试数据的类别
print(json.loads(json_response.text))
# print(json_response.text.split(':')[1].strip()[2:-9])
# print(json_response.text.split(':')[1].strip()[2:-9].split(','))
proba = json_response.text.split(':')[1].strip()[2:-9].split(',')
proba
proba = [float(i) for i in proba]
print(proba)

import numpy as np
#
news_dict = {'0': 'car', '1':'entertainment', '2':'military', '3':'sports', '4':'technology'}
print('News Type:',news_dict[str(np.argmax(proba))])
{'predictions': [[0.00735603366, 0.974295, 0.00240160106, 0.00155786274, 0.0143894823]]}
[0.00735603366, 0.974295, 0.00240160106, 0.00155786274, 0.0143894823]
News Type: entertainment